Lesson Overview
The student should develop the ability to maintain straight-and-level flight primarily through the use of outside visual references. The student should be able to reference the instruments inside the airplane to ensure straight-and-level flight is continued. The ability to effectively trim the airplane for straight-and-level flight must also be developed.
References : Airplane Flying Handbook (FAA-H-8083-3C, page(s) 3-10)
| Key Elements |
|
| Elements |
|
| Schedule |
|
| Equipment |
|
| IP Actions |
|
| SP Actions |
|
| Completion Standards |
The student has the ability to turn at varying degrees of bank, maintaining altitude and airspeed. |
Instructor Notes
| Attention |
Level turns sound boring and simple, but there is a lot more to turning than you might think, and a strong grasp on this will make many other maneuvers considerably easier. |
| Overview |
Review Objectives and Elements/Key ideas |
| What |
A level turn is a turn at a specified angle of bank in which altitude and airspeed are maintained. |
| Why |
The ability to understand and fly a level turn is essential to the building of every pilot’s skill set. Level turns are the building blocks to many more difficult maneuvers and will help the pilot in his or her control of the airplane. |
Lesson Details
Turning in level flight is one of the most basic actions taken in flight. It involves all primary flight controls to execute a coordinated level turn. Each is used as follows :
| Ailerons |
Banks the wings and therefore determines the rate of turn at any given airspeed. |
| Elevator |
Moves the nose up or down in relation to the pilot, and perpendicular to the wings. This sets the itch attitude in the turn and "pulls" the nose around the turn. |
| Throttle |
Provides thrust which may be used for airspeed. |
| Rudder |
Offsets any yaw effects developed by the other controls, but is not the control which turns the plane. |
How The Turn Works
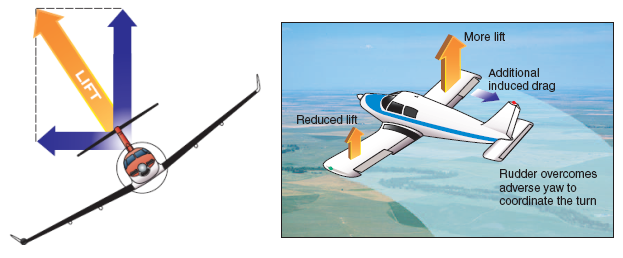
The turn works by causing the aircraft to bank. This, in turn, causes the force generated by the wing to be "tipped" to one side which causes the aircraft to be pulled in that direction. This is done by applying coordinated aileron and rudder to bank the airplane.
In level flight the wing is generating exactly the amount of force (lift) which is equal to the weight of the aircraft, when in level flight. This force is always perpendicular to the surface of the wing.
The tipping of the force generated by the wing can be visualized as taking that force which is perpendicular to the wing and pointing it sideways. If that force is represented as a vector, then that vector can be divided into a vertical component (VC), and a horizontal component (HC). The VC continues to act perpendicular to Earth and opposes gravity, while the HC acts parallel to the Earth’s surface and opposes inertia. It is that horizontal component that actually turns the aircraft.
In appropriating some of the force generated by the wing and using it as a horizontal force, the remaining vertical component no longer has enough force to maintain altitude, and must be supplemented. This is done by increasing the angle of attack thus causing the wing to generate more force. To maintain level flight the VC must always match the weight of the aircraft.
When applying aileron to bank the aircraft the aileron that is lowered produces greater drag than the aileron that is raised. The wing associated with the lowered aileron is producing more lift, which equates to a greater induced drag, creating a yawing motion in the opposite direction of the turn. To counteract this and remain coordinated rudder pressure must be applied in the direction of the turn.
The rate of turn is dependent upon two factors, the airspeed and the horizontal component of lift (which is determined by the bank angle). The greater the bank angle the greater the horizontal component of force, and therefore an increased rate of turn.
As the airspeed increases the aircraft’s rate of turn decreases due to inertia. The greater the inertia the more force it takes to change the aircraft’s direction, and therefore at a given bank angle a higher true airspeed will make the radius of the turn larger.
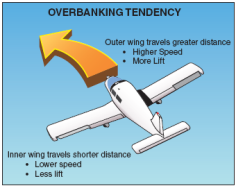
As the radius of the turn becomes smaller a significant difference develops between the speed of the inside wing and the speed of the outside wing. The wing on the outside of the turn travels a longer distance than the wing on the inside in the same length of time. Therefore the wing on the outside has to travel faster, and generates more lift. It is the differential in lift between the inside and outside wings that is the source of the overbaqnking tendency.
In a shallow turn (less than 20°) the excess lift generated by the outside wing is less than the force generated due to the airplanes inherent lateral stability. Therefore in that scenario there is a tendency for the aircraft to return to level flight.
As a shallow bank changes to a medium bank (20° to 45°) and the radius of the turn decreases, the airspeed of the wing on the outside increases in relation to the inside wing, but the force created closely balances the force of the inherent lateral stability. Therefore no additional aileron pressure is needed to maintain the bank.
As the radius decreases further (when the bank progresses from the medium bank to one >45°) the lift differential generates a force that is greater than the force of the inherent lateral stability. Therefore a counteractive pressure on the ailerons is needed to keep the bank from steepening further. Because the outside wing is generating more lift, there is also more induced drag. This causes a slight slip during steep turns that must be corrected with the use of rudder.
During turns the ball in the turn and slip indicator (inclinometer) will be displaced whenever the aircraft is skidding or slipping. In proper coordinated flight there is no skidding or slipping. The old rule of thumb is to "step on the ball" to center it and maintain coordinated flight. Uncoordinated flight will, at a minimum, result is reduced performance due to increased drag.
The current recommended teaching methodology is to use the integrated flight method where in the student first learns the technique by use of outside references, and then integrates use of inside instrumentation immediately thereafter.
The outside references used are the angle formed by the raised wing and the horizon, as well as the top of the cowling and the horizon. Together they create a sight picture which reflects a level turn. The higher the bank, the higher the pitch, so there are different sight pictures for different bank angles.
The inside reference used is the attitude indicator. It is referenced to insure the angle of the wings are set as desired for the turn being executed.
Performing the Level Turn
-
First, clear the area particularly in the direction of the intended turn
-
Simultaneously move the controls and rudder pressure in the desired direction
-
The speed of the plane rolls into the bank depends on the rate and amount of control pressure. The amount of bank depends upon how long the ailerons are deflected.
-
-
Rudder pressure must be enough to keep the ball centered
-
If the ball is not centered, step on the ball to re-center and maintain coordination
-
-
Use the angle made by the cowling and/or wings to establish the desired bank
-
Don’t lean away from the turn
-
There is a tendency to lean away from the turn to remain upright in relation to the ground. Avoid this, as it changes the sight picture.
-
-
Apply back pressure to maintain altitude
-
Total lift must be increased to supplement the force lost to the horizontal vector, and therefore angle of attack must be increased to generate that extra force. More bank == more back pressure. Use the horizon as a reference to maintain level flight. The distance to the horizon should be kept the same as in level flight. Since the seats are to either side of the airplane’s centerline the position of the nose in relation to the horizon will be different in turns to the left versus turns to the right. Learn the correct sight picture for each direction for turn.
-
-
As lift is increased, so is drag. Therefore to maintain airspeed power must be added. This is usually most noticeable in turns with a bank above 30°.
-
Once the desired angle of bank is established aileron and rudder pressures should be released
-
This will stop the bank from increasing since the control surfaces will be neutralized. However, in a very shallow turn aileron pressure will be required in the direction of the turn, and in a very steep turn opposite aileron pressure will be required to counteract the overbanking tendency.
-
-
Maintain altitude by continuing to hold back pressure
-
Throughout the turn cross check the references and occasionally include the altimeter to check pitch altitude.
-
-
If the bank angle is too high or too low, reestablish the desired bank angle using the ailerons.
-
If climbing/descending adjust the pitch attitude in relation to the horizon and recheck the altimeter/VSI to determine if altitude is being maintained. Once an attitude is established that maintains altitude maintain that attitude by making corrections in relation to the horizon.
-
Once all adjustments have been made, trim the aircraft
-
Continue cross checking the outside references with the inside to insure a level turn is being maintained
-
Throughout the maneuver cross check the airspeed indicator and if the speed has decreased more than 5 knots add power
-
Similar to a roll in except the control pressures are used in the opposite direction. Aileron and rudder are applied to the high wing.
-
Lead the roll out by approximately 1/2 of the bank angle
-
If you have 30° of bank then start the roll out 15° before the desired heading
-
-
As the angle of bank decreases back pressure on the elevator should decrease, and trim should be reset as needed
-
Reduce power to maintain the desired airspeed, if needed
-
As the wings come level control pressures should be removed smoothly and attention should be given to visual references, attitude, and heading to determine that the turn has stopped
-
First set the power, the pitch, and let the airspeed stabilize
-
Establish and hold the airplane in the desired attitude using the primary flight controls
-
The proper attitude should be established with reference to the horizon and then verified by reference to the flight instruments
-
-
Then apply trim to relieve whatever pressure was required
-
The attitude must be established and held first, then control pressures trimmed out so that the airplane will maintain the desired flight attitude in "hands off" flight. As previously discussed, if power changes the pitch attitude to maintain level flight will change, and the aircraft will have to be re-trimmed.
-
-
Use the trim frequently, and in small amounts, but don’t attempt to "fly the plane" by use of just the trim.
Any control pressures felt should be the result of deliberate pilot control input during a planned change in airplane attitude. It should not be the result of pressure being applied by the aircraft because the pilot allowed the aircraft to assume control.
Overcoming Tenseness and Over-Controlling
When a pilot becomes tense it becomes easy to start to over-control the aircraft. This is evidenced by the pilot engaging in control movements rather than exerting control pressures. The movements can become jerky and large movements of the flight controls. It also might be evidenced by the presence of white knuckles or general overall nervousness.
This can be prevented by overtly acknowledging the over-controlling tendency, and reverting to a light finger-tip grip of the control, and a reminder of the control pressures desired. If over-controlling is constant one technique is to place a wooden pencil on top of the middle and ring finger and under the index and pointer finger of the hand the student uses to fly. If the student starts the death grip, the force of the pencil on the middle/ring finger will be a reminder to relax, if the student continues to tighten their grip the pencil will break.
Common Errors
-
Failure to cross-check and correctly interpret outside and instrument references
-
Application of control movements rather than pressures
-
Uncoordinated use of the flight controls
-
Faulty attitude and bank control
Conclusion
In a level turn, we establish and maintain our bank angle and pitch attitude in relation to the horizon. The airplane’s attitude is confirmed by referring to flight instruments and its performance. If the airplane performance, as indicated by flight instruments, indicates a need for correction, a specified amount of correction should be applied with reference to the horizon. Then the airplane’s attitude and performance are rechecked by referring to the flight instruments.
ACS Requirements
To determine that the applicant:
-
Exhibits instructional knowledge of the elements of level turns by describing:
-
Effect and use of flight controls.
-
The Integrated Flight Instruction method.
-
Outside and instrument references used for pitch, bank, yaw, and power control; the crosscheck and interpretation of those references; and the control procedure used.
-
Trim procedure.
-
Methods that can be used to overcome tenseness and over controlling.
-
-
Exhibits instructional knowledge of common errors related to level turns by describing:
-
Failure to cross-check and correctly interpret outside and instrument references.
-
Application of control movements rather than pressures.
-
Uncoordinated use of flight controls.
-
Faulty altitude and bank control.
-
-
Demonstrates and simultaneously explains level turns from an instructional standpoint.
-
Analyzes and corrects simulated common errors related to level turns.