Lesson Overview
The student should develop knowledge of the elements related night operations and will understand the unique factors inherent to night flight.
References : Airplane Flying Handbook (FAA-H-8083-3C), Pilot’s Handbook of Aeronautical Knowledge (FAA-H-8083-25C, page(s) 14-17), Airmans Information Manual
| Key Elements |
|
| Elements |
|
| Schedule |
|
| Equipment |
|
| IP Actions |
|
| SP Actions |
|
| Completion Standards |
The student is comfortable in his understanding of the factors involved in night operations and can confidently and safely pilot an aircraft at night. |
Instructor Notes
| Attention |
A lot of people prefer night flying to day fling. The air tends to smoother, the radios tend to be quieter, there’s less traffic and it’s more relaxing. |
| Overview |
Review Objectives and Elements/Key ideas |
| What |
Night operations are the factors dealing with and the operation of the airplane at night. |
| Why |
It is important to talk about night flight as it presents many unique situations which, if ignored, can result in dangerous situations. Also, if you learn to use your eyes correctly and know your limitations, night vision can be used more effectively. |
Lesson Details
How the Eye Works
Night operations are primarily impacted by how our eyes work, and their response to the dark. The eyes have specialized nerve cells called rods and cones which respond to light, each in their own way.
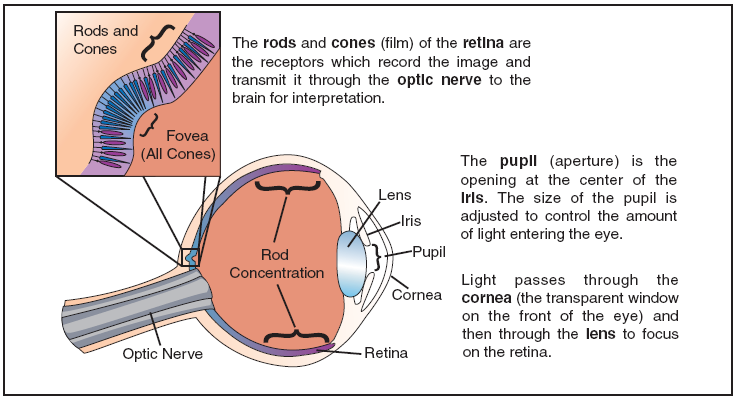
The cones are responsible for color, detail, and far away objects and are located in the center of the retina. The rods are responsible for peripheral and dim light vision, and are located around the cones. Both are used in daylight, but without normal light the function of vision falls almost exclusively to the rods. In the center of the retina is an area called the fovea where almost all the light sensing cells are cones. This is where most "looking" happens, and where the most detail is discerned.
It is the rods that make night vision possible. During times when there is ample light objects can be seen by looking directly at them, but low light conditions this ability diminishes. Without sufficient light the cones simply don’t trigger. Since cones only work with sufficient light, and the rods are outside the center of vision (the fovea), to detect objects in low-light conditions the peripheral vision capability must be used instead. The pilot must look slightly to the left or right to detect traffic.

One problem with rods is that bright light overwhelms them and they can take some time to reset to the dark again. It can take 30 minutes to adapt, but once adapted rods are 100,000 times more sensitive to light. Exposing them to bright light even briefly can reset this adaptation and require another period of dark to re-adapt.
Night vision is based on the rods and off-center viewing is required to be effective. Staring directly at an object at night can result in it vanishing from view. It is critical to avoid bright lights before, and during, flight at night. Therefore cockpit lighting must be kept to a minimum during night operations.
Disorientation and Night Optical Illusions
Along with general low light limitations, there area a number of illusions which are specific to night operations.
- Autokinesis
-
Autokinesis an illusion where staring at a single point of light can make it seem to move. This can cause the pilot to mis-identify the light as a target, and can be prevented by changing the focus of the eyes and avoiding fixation.
- False Horizon
-
This is caused when the natural horizon is obscured at night, and can be generated by confusion between bright stars and lights on the ground. Trust your instruments.
- Featureless Terrain
-
This is an absence of ground features which can create the illusion that the aircraft is higher than it really is. This can result in a lower than normal approach. Trust your instruments.
- Runway Slopes
-
An up-sloping runway (or terrain) can create the illusion that the aircraft is higher than it actually is, thus potentially flying a lower approach. For a down-sloping runway (or terrain) the opposite is true. Be prepared by using the chart supplement to know the slope that will be encountered.
- Ground Lighting
-
Regularly spaced lights, such as along a highway, can create the illusion that it is a runway. Moving trains have also been mistaken for runway/approach lights as well. Overly bright runway lights can create the illusions that the aircraft is closer than it really is, and maintaining situational awareness is the key way to mitigate these illusions. Know what to expect, and use tools such as navaids to maintain that situational awareness.
Reference to flight instruments and knowing what to expect at the destination are key tools to avoid succumbing to illusions. Tools such as using an ILS or a VASI at night to insure correct vertical guidance can be useful. At night incorporate instruments into the scan more heavily. If there is ever any doubt, go around.
Operations
Pilot Equipment
The equipment used at night is important for safe operation, as well. Be sure to have a reliable light source, both white and red. Use the white light for pre-flight operations, and the red light for in-cockpit use during flight. The red light is dimmer and impacts the rods less than white light.
| However, caution must be used when using red light on an aeronautical chart as the red light can obscure some markings. |
Insure the proper charts are in the aircraft. Be aware that city lights can be seen from far distances, and this can cause confusion without good charts to help maintain situational awareness. Finally, regardless of how the pilot is equipped, good organization at night can help reduce workload.
Preflight Inspection
The pilot should understand the required equipment for night flight. Two mnemonics that can be used are A TOMATO FLAMES (the VFR minimum equipment list) with the additional mnemonic FLAPS added for night flight. These stand for, respectively, the following items :
-
A – Altimeter.
-
T – Tachometer.
-
O – Oil Temperature Gauge.
-
M – Manifold Pressure Gauge (If applicable)
-
A – Airspeed Indicator.
-
T – Temperature Gauge (For each liquid cooled engine)
-
O – Oil Pressure Gauge.
-
F – Fuel Gauges.
-
Fuses
-
Landing Light(s)
-
Anti-Collisions Light(s)
-
Position Lights
-
Source of Power
Equipment for IMC is not required, but it certainly doesn’t hurt if the pilot is familiar with the use of that equipment.
As for any flight, a full preflight inspection is necessary. Use a white flashlight for the inspection to insure nothing is overlooked, and check all aircraft lights for proper operation. Given the reduced visibility at night, perform a careful check of the ramp area for obstructions.
Taxiing, Airport Orientation, and the Run-Up
Due to restricted vision taxi speeds should be kept to a minimum. Don’t taxi faster than a speed that will allow you to stop within the distance you can see. Use landing and taxi lights as necessary, but use strobes with caution to avoid blinding other pilots.
Maintaining orientation on the airport surface is critical at night, again due to limited visibility. Have an airport diagram available, and make sure all taxiway markings, lights, and signs are understood.
The run-up should be performed with a checklist, as usual, but it might be harder to detect forward motion of the aircraft at night. Pay extra caution during the run-up to insure inadvertent movement does not occur.
Takeoff and Climb
As usual, clear the approach for traffic understanding that identifying targets at night has special visual challenges (see above). At an uncontrolled airport perform a 360 degree turn to scan the entire pattern, and remember that silence on the radio does not mean no aircraft in the area. At a tower controlled airport after receiving clearance align the aircraft on the centerline of the runway. Check the compass to insure the correct runway is being used. Perform a normal takeoff and take advantage of instruments due to the reduction in normal visual cues.
During the climb once again leverage the instruments. At night it can be hard to visually determine the rate of climb, so use the VSI to insure the aircraft is climbing as desired. Turns should not be made until reaching a safe maneuvering altitude.
In-Flight Orientation
Checkpoint visibility at night can change dramatically. Lights of towns are more visible, and airport beacons can be useful for verifying position. Highways can be easier to identify due the the lights of cars, and navaids should be used whenever possible. Loss of orientation can be particularly problematical as at night re-establishing orientation can be more difficult.
It is hard, sometimes impossible, to see clouds at night. Be particularly careful to not fly into MVFR/IFR conditions at night. A first indication that the aircraft may be encountering MVFR/IFR conditions is the slow loss of lights on the ground. Don’t assume the aircraft will "pop out the other side", but take action immediately. A gentle 180 degree turn back to clear conditions might be the best option to exit the MVFR/IFR conditions.
During flight at night remember that the red light is on the left wing, and the green light is on the right, with the white light on the tail. Use these lights to orient yourself with respect to other aircraft encountered.
Traffic Patterns
Identify runway/airport lights as soon as possible, recognizing that airports within a city can sometimes be very difficult to identify at night. Fly towards the airport rotating beacon until the runways can be identified, and compare the runway lights with the heading indicator to insure you are in the right place. If possible tune the localizer for course guidance to the runway and/or use the OBS function of a GPS to view an extended runway centerline.
Distance can be hard to discern at night. A lack of ground references and the inability to compare their location and size causes this difficulty. More trust must be put in the instruments. Lights should be on for collision avoidance, and a normal traffic pattern should be flown. Know the location of the runway and/or threshold lights at all times, and allow plenty of time to run the normal checklists.
Approach and Landing
Use of a stabilized approach, as during day operations, is desired. At night a higher reliance on instruments is beneficial to mitigate the reduced visibility. Remember that distance, height, and other items normally managed visibly may be more difficult to discern. Maintain appropriate airspeeds and vertical descents for the approach.
During the final approach if there are no centerline lights align the aircraft between the runway side lights. Use approach lights (VASI, PAPI, etc.) to maintain a proper glideslope. Tune the glideslope (if able) to give additional guidance.
As during any other landing, a smooth controlled roundout and touchdown should be performed. Judgment of height above the surface can be difficult, and it is normal to round out too high. In the event no landing light is available starting the roundout when the end runway lights appear to be higher than the airplane can be a good cue.
Go Around
Prompt initiation of a go around, if needed, is even more important at night than in the daytime due to the reduced visibility. Fly the go around as it would normally be flown but with a greater emphasis on cross-checking against instruments to insure that control of the aircraft is maintained.
Night Emergencies
The greatest electrical load is placed on the aircraft at night, and therefore the system has an increased chance of failure. In the case of a suspected electrical problem reduce load as quickly as possible, and as much as possible. If total failure is a possibility, land as soon as possible and address the problem on the ground.
In the event of an engine failure … first, don’t panic. Establish a normal glide and turn toward an airport or away from congested areas. Use the checklist to determine the possible problem, and attempt an engine restart. If no restart is possible, remember to first fly the plane. Maintain control at all costs. Maintain orientation with the wind, and don’t land downwind unless there is no other choice (it increases speed over the ground reducing the chance of a good outcome). Turn landing lights on, and if able announce your emergency to ATC, UNICOM, and/or guard (121.5). If you are already on a frequency with ATC don’t change it unless instructed to do so.
If an off-airport landing is necessary, land in an accessible area if possible. Run your before landing checklist, and touch down at the slowest possible speed. Always fly the aircraft until it comes to a stop. Once stopped turn off all switches and evacuate as quickly as possible.
Conclusion
Night operations present unique situations to a pilot and require diligence to maintain orientation and safety. Night flying is not inherently dangerous but it can require more effort. Overall, though, it is very enjoyable.
ACS Requirements
To determine that the applicant exhibits instructional knowledge of the elements of night operations by describing:
-
Factors related to night vision.
-
Disorientation and night optical illusions.
-
Proper adjustment of interior lights.
-
Importance of having a flashlight with a red lens.
-
Night preflight inspection.
-
Engine starting procedures, including use of position and anti-collision lights prior to start.
-
Taxiing and orientation on an airport.
-
Takeoff and climb-out.
-
In-flight orientation.
-
Importance of verifying the airplane’s attitude by reference to flight instruments.
-
Night emergencies procedures.
-
Traffic patterns.
-
Approaches and landings with and without landing lights.
-
Go-around.