The art of VOR navigation and CDI interpretation seems to flummox people on a regular basis. It is one of the more frustrating things I’m obligated to teach simply because so many students find it so confusing. It isn’t hard, honestly, but does require an understanding of what is being depicted and how to use the information. (It doesn’t hurt to also have a facility with visualizing spatial relationships, either.)
Lets start by first talking about what the VOR signal actually is. The VOR station outputs a signal that indicates the bearing from the VOR station. That bearing from the station is called a radial. A radial is always from the VOR, and it is important to remember that relationship (again, it helps to be able to visualize that spatial relation, but remember that "radials always radiate outward".) And, that is the ONLY INFORMATION given to your equipment by the VOR signal. The azimuth (direction) from the station. Nothing else. But with this signal and the CDI you can navigate successfully.
Language
There is a "language" to navigation, words used to mean specific things as one talks about navigating. Lets start by getting on the same page with these various terms. It is important to understand what each means, and what role each thing plays in navigating.
- COURSE
-
This is a desired path over the ground. The course of an aircraft is the cardinal direction in which the craft is to be steered. The course is to be distinguished from the heading, which is the direction where the watercraft’s bow or the aircraft’s nose is pointed.
- HEADING
-
The heading of an aircraft is the compass direction in which the plane’s nose is pointed. Note that the heading may not necessarily be the direction that the vehicle actually travels, which is known as its course or track. Any difference between the heading and course is due to the motion of the air.The difference is known as the drift.
- BEARING
-
Bearing refers to the clockwise angle between the magnetic north (magnetic bearing) or true north (true bearing) and an object. For example, an object to due east would have an absolute bearing of 90 degrees. Thus, it is the same as azimuth.
- TRACK
-
The track is the path the aircraft follows over the ground. Ideally the track is the same as the course. However, regardless of the desired course or the aircraft’s heading, the track is always the actual path taken over the ground.
With those terms in mind, lets start to discuss how to navigate using the VOR. The primary instrument referenced when engaging in VOR navigation is the Course Deviation Indicator.
CDI
The Course Deviation Indicator (CDI) is an instrument that does exactly what it says it does. It allows you to select a desired course and then indicates your deviation from that course.
The CDI has a single control (the Omni-Bearing Selector (OBS) knob) and a two indicators. Those are a needle that shows both degree and direction of deviation from the selected course and the TO/FROM indicator showing whether the course selected takes you closer TO the VOR or further FROM the VOR. Lets look at an example CDI.
The distinction between a "course" and a "heading" is critical to keep in mind. A "course" is a desired track across the ground. A "heading" is the direction in which the aircraft is currently pointed. Furthermore, a "track" is the path the aircraft is following over the ground. In a perfect situation you have a heading that causes the aircraft to track precisely along the desired course. Please keep these different concepts clearly separated in your mind, as understanding those differences are critical to navigation.
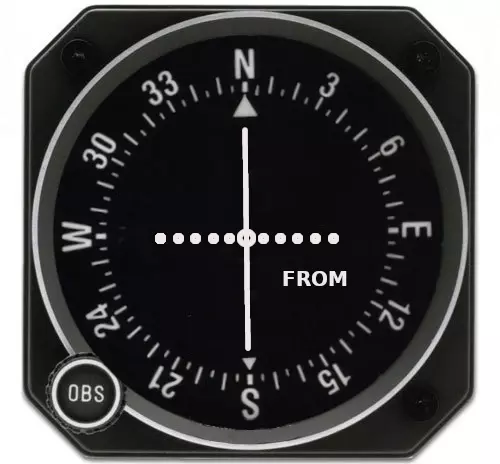
This CDI is showing the OBS set to 360° (aka: North). The needle is centered showing that we are on the selected course, and the TO/FROM indication is showing that the selected course is FROM the VOR. This also means that the aircraft is on the 360° radial.
However, in the following image the scenario is different, and the distinction is critical to understand.
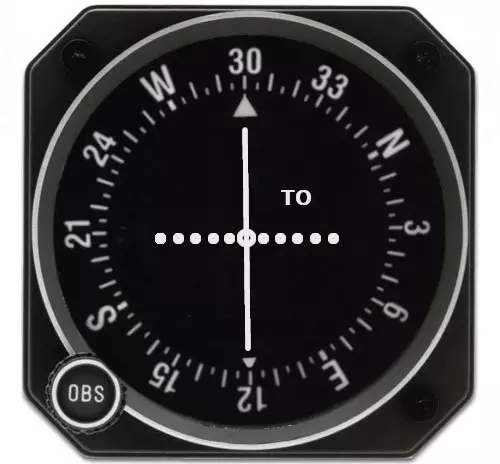
The CDI has selected a 300° course, but it should be understood that this is actually the 120° radial. Note that the CDI is giving a TO indication. This shows that the course selected is one TO the station, but radials "radiate out from" the station, therefore the radial is the reciprocal of the selected course in this situation.
Finally the needle indicates where the course lies with respect to the radial upon which the aircraft currently finds itself. Be careful with thinking about "right" versus "left". In CDI interpretation right and left can lead you astray because the indications do not care about your current heading. All it can do is inform you as to how to intercept a desired heading, and this is independent of the direction in which the aircraft is currently pointed. Lets look at one more example.
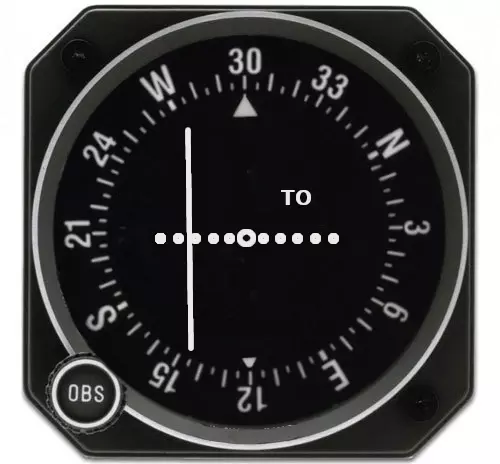
Like Figure 2, the CDI is showing a 300° course, but we are not on the 120° radial this time. The desired radial (and desired course) is some distance off of our current radial. Is it right? Is it left? Stop …. you don’t care about right and left. What you care about his how to get to the desired radial. How do you figure that out? Read on, as this is discussed in the Interpret section below.
Pop quiz …. for the image in Figure 1 lets say that the current heading for the aircraft is 050°. What changes on the CDI if the aircraft were, instead, flying a 270° heading? The answer is that NOTHING changes. This is because the VOR receiver gets exactly the same signal no matter which way the aircraft is pointed.
Steps for Success
While it pays to have a deep understanding of the VOR navigation technology and a flawless ability to visualize spatial relationships, that level of understanding isn’t actually required to be successful at VOR navigation. We can boil it down into a set of steps that can almost be mechanically executed to result in a good outcome. Lets list them here first.
-
Turn - First immediately turn to the heading you desire. You won’t (yet) be on course, but will at least be going in the right direction.
-
Twist - Twist the OBS to center the needle with the TO/FROM indicator set as desired, then twist the OBS to the course you need to intercept.
-
Interpret - With the OBS set to the desired course, interpret the CDI to identify a heading that will intercept that course.
-
Track - Once the course is intercepted, turn to track the course accounting for any wind.
See, simple. The devil is in the details, of course, as it always is. Lets talk about each of these steps in more detail.
Turn
When you are given the task of intercepting a course to or from the VOR you are likely heading in an arbitrary direction. Is that direction helping or hurting you? Who knows? But if you first turn to a heading that matches the desired course you will at worst be paralleling the course you need to fly, and will be going in the right general direction.
All too often I see people simply continue blindly on whatever heading they are on, often causing them to get further and further away from the desired course and thereby making it take longer to eventually intercept the desired course. This is most striking if they are tasked to pick up a new course after VOR station passage. This is a point where the radials are VERY close together (they come to a point at the VOR station itself, obviously).
How do you know the correct direction? The heading you take depends upon whether you are being asked to fly TO the VOR station, or FROM the VOR station. There are a number of ways to state a VOR navigation task. For instance :
-
"Fly the 260 radial FROM the VOR." In that case you’d turn to a heading of 260° because radials always "radiate away from" the VOR, and 260 was the radial you are being asked to fly FROM the VOR.
-
"Fly the 260 radial TO the VOR." Sounds similar, right? However, since you are being asked to fly TO the VOR, but a radial is always FROM the VOR, the heading you need will be the reciprocal of the radial. Therefore the heading you need for this task is 080°, the opposite direction from 260°.
-
"Fly a 080° bearing TO the VOR." This is simple because you are being given the magnetic bearing desired. So you turn to that heading as your first step.
Note, this first step of turning is only to help with getting the pilot initially oriented and to avoid flying further from the desired course. If the pilot can identify the desired course quickly enough (i.e. if they understand and can execute the Twist and Interpret steps quickly enough) it isn’t strictly needed.
Twist
Now that the aircraft is headed in the right general direction, setting up for the desired course can happen. I suggest doing this in two steps (though, the initial step isn’t strictly necessary, but it helps orient the user). The task set before us is to fly a 300° course to the VOR starting from an arbitrary location on an arbitrary radial.
First twisting the OBS to center the needle with the TO/FROM indication as desired. So, if you are told the intercept the 120° bearing to the VOR, twist the OBS to center the needle with a "TO" showing on the CDI. This gets the OBS initially oriented and informs you as to which radial you happen to currently be on. So lets do that first.
We see that we are on a radial that is directly south of the VOR, though that is not the course we desire. But we have a TO indication, and a centered needle. The first orientating twist is done.
Now for the second step. We twist the OBS to the desired course. In this case we twist until we have 300° selected. This causes the needle to offset as that selects a radial which we are not currently on.
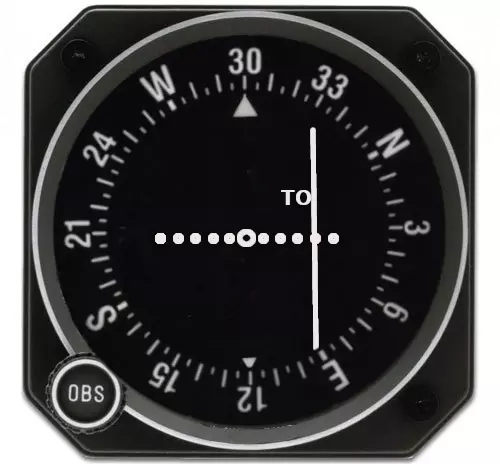
The result looks like what is seen in the previous figure.. Now all that is left is to interpret what we see.
Interpret
This is where people go astray. They look at their current heading, often tilt their heads looking at the CDI, and try and figure out if they need to turn left or right. It is confusing. It also doesn’t work very well! But interpreting the indications is not hard, as long as you understand what you are seeing.
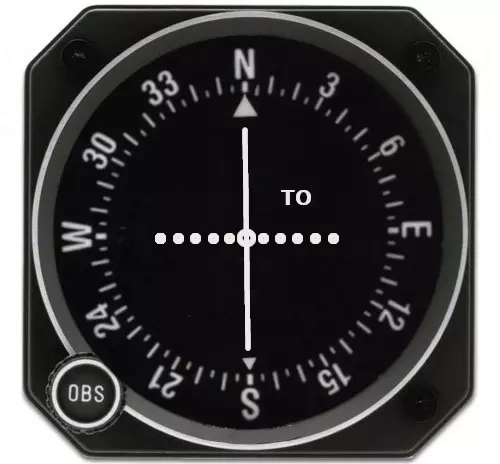
Given the indication above, we can divide the CDI into two hemispheres. Since we have TO indication the top half of the CDI tells you ALL HEADINGS that would take you closer to the VOR (closer, but not necessarily directly to the VOR). The bottom hemisphere is a collection of headings that would take you further from the VOR. This helps because the task given is to fly "to the VOR on a 300° course".
We now have one final thing to figure out. How to get to that pesky course. Is it right? Is it left? STOP THAT! Forget left and right. You are a pilot. You want a a heading. So here is the secret.
Looking at that top half of the CDI you see possible headings ranging from roughly 210° to 030°, and now just need to figure out what will work. In that top hemisphere the quadrant indicated by the needle has the collection of headings that will achieve your goal.
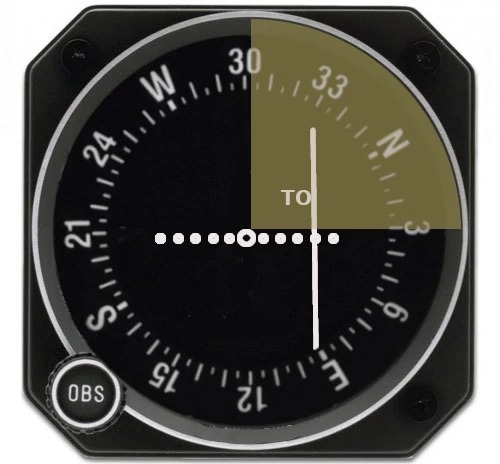
Looking at the shaded area in this image. It is in the upper hemisphere (TO the VOR) and is in the quadrant on the side of the needle deflection (to the course). Therefore in this shaded quadrant are headings that will take you both toward the VOR and toward your course. These headings are between roughly 300° and 030°. Which do you pick? It depends upon how quickly you wish to intercept your desired course. A 305° heading will slooooowly creep you closer to your course because the intercept angle is so slight. Maybe so slowly, in fact, that you’ll pass the VOR before you intercept. A 030° heading will have you flying an intercept angle of about 90 degrees;, which is very aggressive. Unless you significantly lead the turn to your desired ultimate heading you’ll quickly fly right through your desired course and have to re-intercept.
Normally picking a heading somewhere in the middle is a good choice, particularly if you don’t have a full deflection of the needle. When doing this does it matter what heading you are CURRENTLY ON? NO! The way you are pointed as you make the determination of which way to head to get to your course is utterly irrelevant. Why do I obsessively talk about how your current heading doesn’t matter, nor does it play into any decision you make about how to get to your course? It is because that is a source of regular confusion on the part of fledgling pilots. So I really want to hammer it home.
Track
Now we need to track the desired course. This is mostly a matter of turning to the proper heading (in the above example that would be 300°), then correcting for wind. As you get close to your course the needle will move toward the circle in the center of the horizontal row of dots on the CDI, often referred to as the donut. As it gets close to the donut start your turn to the desired heading. You will need to lead the turn a bit otherwise you’ll fly through your course and have to re-intercept. Once intercepted, you are on the desired course line.
You know the correct no-wind heading, it is the one that is the direct bearing to or from the VOR. You can read that right off the face of the CDI. But we rarely have a no-wind condition, so wind corrections are required. You can start by flying that heading, however, and watch the needle.
If the needle moves outside the center donut, tweak your course. The needle can wiggle a bit, mostly because this is an analog system and the detecting of subtle phase changes in the signal can vary from moment to moment. Therefore when you are outside the donut make a course correcting, often of only a few degrees, then give it time to change indication.
Wind Correction
I all too often see people just randomly selecting headings to try and figure out what will hold the desired course. However, there is a better strategy that can be used to zero in on the heading that will result in successfully tracking the desired course.
If you get pushed off the course, identify a heading that will re-intercept. As you re-intercept you have two pieces of useful information. First, you know that the simplistic no-wind heading won’t maintain the course. Second, you know that the intercept heading is good for intercepting, but if held will simply fly you through the course. You need something in-between the two.
So as you center your needle pick the heading exactly in-between. Then give it time so you can see how well that newly selected heading holds the course. There are three possibilities. One, it might be perfect, and the needle stays in the donut. Two, it might not be enough and you get blown off the course just as you did earlier. Three, it might be too much, and you once again fly through the course.
In the example above the bearing direct to the VOR was 300°. For the sake of discussion lets say that flying a 300° heading failed to hold the course. As you look at the CDI to determine a heading to re-intercept, you select a heading of 280° (so a slight turn to the left). That heading end up working to bring you back to your course, and re-center your needle. What now?
As the needle centers turn to another heading selected to, you hope, track the desired course. You know that 300° didn’t hold the course, and that 280° intercepted the course (and if maintained would continue to fly through the desired course), so picking something in the middle might result in you selecting a heading of 290°, that being a heading right between the two you used earlier.
Obviously, if 290° holds the course you are good. In either of the other two cases you have to repeat the re-intercept exercise. But, this time the deviation should be less. Pick a heading that will re-intercept, and upon intercepting pick a new heading between the intercept heading and the previous heading that failed to hold the course. Any software geeks out there will recognize this as a "binary search".
For any of this to work in a reliable manner, though, you must have heading discipline. By that I mean, when you pick a heading you must hold it, and not let your heading wander. If your heading is wandering you can’t know if the reason you are off course is because of wind, or because you can’t keep your nose from wandering.
There is one sad fact, and that is winds change and after you have found the perfect heading …. the wind changes and you have to do it all over again. Welcome to flying!
Summary
If you were able to follow the steps above, and the explanations of how these steps achieve the desired goal, you will be able to easily use VORs for navigation. Just remember ……
-
Turn — to the desired bearing
-
Twist — the CDI to the desired course
-
Interpret — determine the desired heading
-
Track — adjust for wind to track the course
The steps can fit onto a 3x5 note card so how hard can it really be?
I want to credit George Scheer for his insights on CDI interpretation. His original article on the subject can be found at VOR Orientation, Intercepting and Tracking. I wanted to expound on his writing, mostly by adding more images, to see if I can help my students more easily grasp the concepts. Hopefully it will help.